Code with Workers
Overview
In this part, you'll learn the fundamentals of Cloudflare Workers and create your first "Hello World" Worker. Since you've already completed the setup in prerequisites, we'll dive straight into understanding Workers and building your first application.
What are Cloudflare Workers?
Cloudflare Workers is a serverless computing platform that runs JavaScript/TypeScript code at Cloudflare's edge locations worldwide. They allow you to:
- Execute code at the edge (closest to your users)
- Handle HTTP requests and responses
- Integrate with Cloudflare services (R2, D1, KV, etc.)
- Scale automatically without managing servers
Workers Runtime Environment
Workers operate in a unique runtime environment with access to bindings:
export interface Env {
  // Environment bindings are injected here
  CLOUDFLARE_API_TOKEN: string; // Secret binding
  MY_KV: KVNamespace; // KV binding
  MY_R2: R2Bucket; // R2 binding
}

export default {
  async fetch(
    request: Request,
    env: Env,
    ctx: ExecutionContext
  ): Promise<Response> {
    // Your Worker logic here
    // env contains all your bindings
    // ctx provides execution context methods
    return new Response("Hello World!");
  },
};
TLDR;
🔒 🚀 Let me go whoooooosh
This content is password-protected. Enter the password to view the content.
Lab 1.1: Foundation - Hello World API
Lab Objective: Create and deploy your first Cloudflare Worker with a basic API endpoint to understand the development workflow and Worker architecture.
What You'll Learn: Project structure, local development, edge deployment, and basic request handling.
What You'll Build: A simple Worker with a single
/endpoint that returns "Hello World!" - this will be the foundation for our progressive API.
Step 1: Create a New Worker Project
Since you already have wrangler installed and authenticated from Module 0, let's create a new Worker:
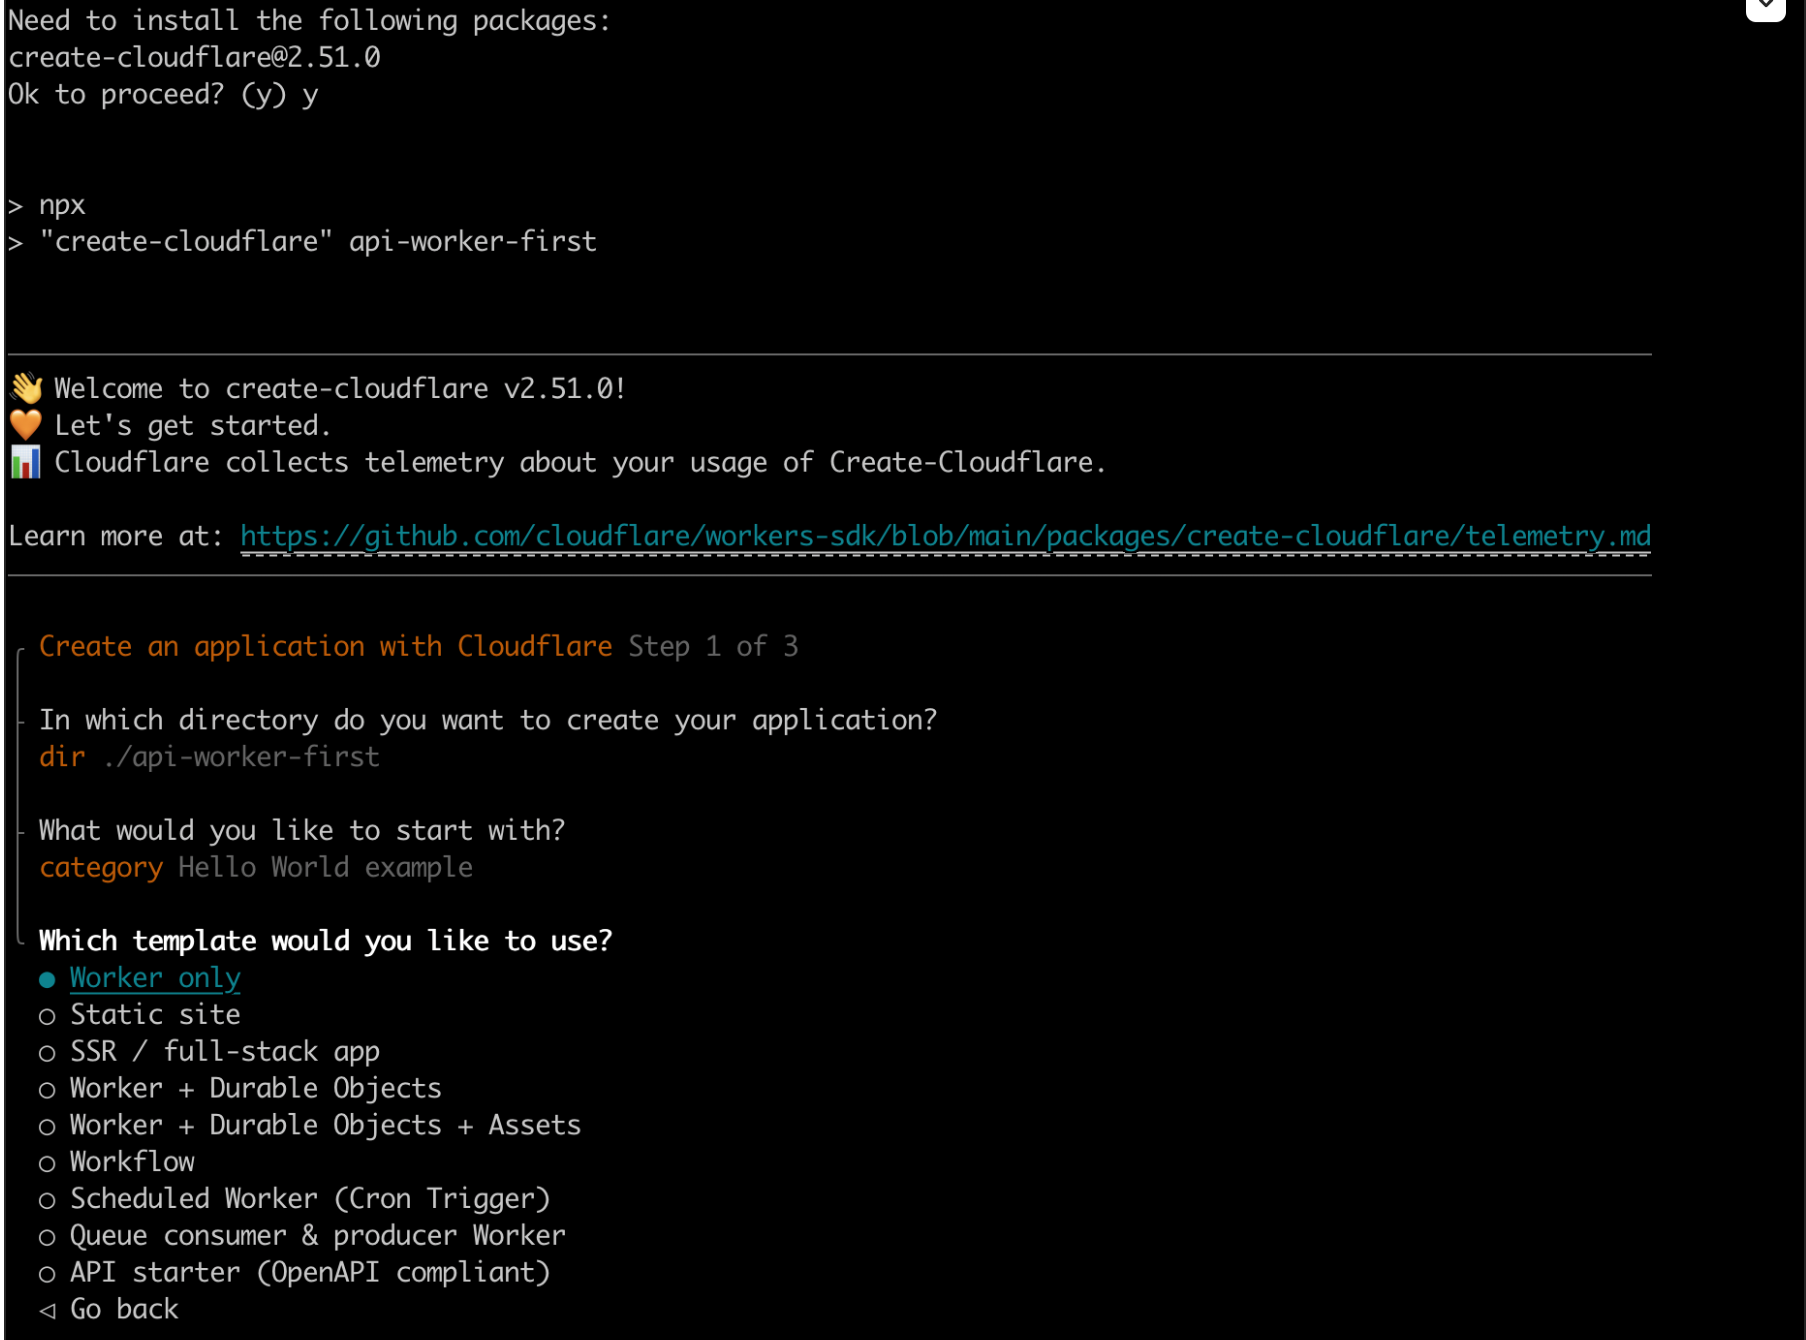
npm create cloudflare@latest hello-workers-<YOUR_NAME>
When prompted:
- Choose Hello World Example
- Which template: Worker only
- Use TypeScript: Yes
- Use git: Yes (recommended)
- Deploy now: No (we'll deploy manually)
Step 2: Explore the Project Structure
Navigate to your project and examine the key files:
cd hello-workers-<YOUR_NAME>
ls -la
Your project contains these essential files:
wrangler.jsonc- Worker configurationsrc/index.ts- Your Worker codepackage.json- Project dependencies.gitignore- Git ignore rules
Step 3: Create Your Foundation API
Replace the default code with our foundation API structure:
export interface Env {
  // Environment bindings will be added in later labs
}

export default {
  async fetch(
    request: Request,
    env: Env,
    ctx: ExecutionContext
  ): Promise<Response> {
    const url = new URL(request.url);
    const path = url.pathname;

    // Foundation endpoint - we'll add more in Lab 1.2
    if (path === "/") {
      return new Response(
        JSON.stringify({
          message: "Hello World!",
          timestamp: new Date().toISOString(),
          version: "1.0",
        }),
        {
          headers: { "Content-Type": "application/json" },
        }
      );
    }

    // Default 404 response
    return new Response(
      JSON.stringify({
        error: "Not Found",
        path: path,
      }),
      {
        status: 404,
        headers: { "Content-Type": "application/json" },
      }
    );
  },
};
Code Breakdown:
export interface Env- TypeScript interface for environment bindings (we'll expand this)export default- Exports the Worker handlerfetch- The main function that handles HTTP requestsnew URL(request.url)- Parses the request URL for routingJSON.stringify()- Returns structured JSON responsesContent-Type: application/json- Sets proper response headers
Step 4: Develop Locally
Start the development server:
npx wrangler dev
What happens:
- Wrangler starts a local development server
- Your Worker runs on
http://localhost:8787 - Changes to your code are automatically reloaded
Test your Foundation API:
- Open your browser to
http://localhost:8787 - You should see a JSON response with "Hello World!" message
- Try
http://localhost:8787/nonexistentto see the 404 response
Step 5: Deploy to the Edge
Deploy your Worker to Cloudflare's global network:
npx wrangler deploy
What happens:
- Your code is uploaded to Cloudflare
- A unique URL is generated (e.g.,
https://hello-workers-<YOUR_NAME>.your-subdomain.workers.dev) - Your Worker is now running on 200+ locations worldwide
Test the deployed Worker:
- Copy the URL from the deployment output
- Visit it in your browser
- You should see the JSON response served from the edge
Lab 1.1 Summary
✅ What you've built: A foundation API Worker with:
- Single
/endpoint returning JSON - Basic error handling (404 responses)
- Proper JSON headers
- TypeScript structure ready for expansion
🎯 Next: In Lab 1.2, we'll build upon this foundation by adding more endpoints and routing to the same Worker code.
Lab 1.2: Enhanced Routing - Multiple API Endpoints
Lab Objective: Build upon your Lab 1.1 foundation Worker by adding multiple API endpoints and enhanced routing.
Prerequisites: Completed Lab 1.1 with the foundation API Worker deployed.
What You'll Learn: Advanced routing, request information handling, health checks, and structured API responses.
What You'll Build: Expand your existing Worker with
/info,/health, and/timeendpoints while maintaining the foundation/endpoint.
Step 1: Enhance Your Existing Worker
Now let's build upon the foundation code from Lab 1.1. Open your existing hello-workers-<YOUR_NAME> project and enhance the src/index.ts file:
export interface Env {
  // Environment bindings will be added in later labs
}

export default {
  async fetch(
    request: Request,
    env: Env,
    ctx: ExecutionContext
  ): Promise<Response> {
    const url = new URL(request.url);
    const path = url.pathname;
    const method = request.method;

    // Enhanced routing - building upon Lab 1.1
    switch (path) {
      case "/":
        // Enhanced foundation endpoint from Lab 1.1
        return new Response(
          JSON.stringify({
            message: "Hello World!",
            timestamp: new Date().toISOString(),
            version: "1.1", // Updated version
            availableEndpoints: [
              "GET /",
              "GET /info",
              "GET /health",
              "GET /time",
            ],
          }),
          {
            headers: { "Content-Type": "application/json" },
          }
        );

      case "/info":
        // Request information endpoint
        const info = {
          method: method,
          url: request.url,
          path: path,
          userAgent: request.headers.get("user-agent"),
          cfRay: request.headers.get("cf-ray"),
          cfCountry: request.headers.get("cf-ipcountry"),
          timestamp: new Date().toISOString(),
        };
        return new Response(JSON.stringify(info, null, 2), {
          headers: { "Content-Type": "application/json" },
        });

      case "/health":
        // Health check endpoint
        return new Response(
          JSON.stringify({
            status: "healthy",
            uptime: "operational",
            timestamp: new Date().toISOString(),
            service: "Cloudflare Worker API",
          }),
          {
            status: 200,
            headers: { "Content-Type": "application/json" },
          }
        );

      case "/time":
        // Time information endpoint
        const now = new Date();
        return new Response(
          JSON.stringify({
            timestamp: now.toISOString(),
            unix: Math.floor(now.getTime() / 1000),
            timezone: "UTC",
            formatted: now.toUTCString(),
          }),
          {
            headers: { "Content-Type": "application/json" },
          }
        );

      default:
        // Enhanced 404 response
        return new Response(
          JSON.stringify({
            error: "Not Found",
            path: path,
            method: method,
            availableEndpoints: [
              "GET /",
              "GET /info",
              "GET /health",
              "GET /time",
            ],
          }),
          {
            status: 404,
            headers: { "Content-Type": "application/json" },
          }
        );
    }
  },
};
Step 2: Test Your Enhanced API Locally
Start your development server (if not already running):
npx wrangler dev
Test all your new endpoints:
GET http://localhost:8787/- Enhanced foundation endpoint with available endpoints listGET http://localhost:8787/info- Request information including Cloudflare headersGET http://localhost:8787/health- Health check with service statusGET http://localhost:8787/time- Current time in multiple formatsGET http://localhost:8787/invalid- Enhanced 404 response with available endpoints
Step 3: Deploy Your Enhanced API
Deploy your updated Worker:
npx wrangler deploy
Test your deployed endpoints using the same URLs but with your Worker's domain.
Step 4: Understanding the Enhancements
What's new from Lab 1.1:
- Enhanced routing: Switch statement for cleaner path handling
- Request information: Access to Cloudflare-specific headers (
cf-ray,cf-ipcountry) - Structured responses: Consistent JSON format across all endpoints
- Better error handling: Informative 404 responses with available endpoints
- API discovery: Root endpoint lists all available endpoints
Lab 1.2 Summary
✅ What you've built: Enhanced your foundation API with:
- 4 functional endpoints (
/,/info,/health,/time) - Cloudflare-specific request information
- Consistent JSON responses
- Enhanced error handling
- API endpoint discovery
🎯 Next: In Lab 1.3, we'll add environment variables and secrets to make our API configurable and secure.
Lab 1.3: Configuration & Secrets - Environment Management
Lab Objective: Build upon your Lab 1.2 API by adding environment variables, secrets management, and configuration endpoints.
Prerequisites: Completed Lab 1.2 with the enhanced API Worker deployed.
What You'll Learn: Environment variables, secrets management, TypeScript bindings, and secure configuration practices.
What You'll Build: Add
/configand/secretsendpoints to your existing API while demonstrating secure environment management.
Step 1: Understanding Environment Variables vs Secrets
Environment Variables: Non-sensitive configuration values that can vary between environments. Secrets: Sensitive data like API keys, tokens, passwords that need encryption.
Step 2: Configure Environment Variables
First, let's add environment variables to your wrangler.jsonc file. In your existing hello-workers-<YOUR_NAME> project, update the configuration:
{
  "name": "hello-workers-<YOUR_NAME>",
  "main": "src/index.ts",
  "compatibility_date": "2024-01-01",
  // Environment variables (non-sensitive)
  "vars": {
    "API_VERSION": "1.2",
    "ENVIRONMENT": "development",
    "API_NAME": "BlazeHack API",
    "MAX_REQUESTS_PER_MINUTE": "100"
  }
}
Step 3: Add Secrets
Add secrets using the Wrangler CLI (these are encrypted and secure):
# Add secrets to your Worker
npx wrangler secret put API_SECRET_KEY
# When prompted, enter: blazehack-secret-2025

npx wrangler secret put ADMIN_TOKEN
# When prompted, enter: admin-token-xyz789
Step 4: Update TypeScript Interface
Update your TypeScript interface to include the new environment bindings:
export interface Env {
  // Environment variables (from wrangler.jsonc)
  API_VERSION: string;
  ENVIRONMENT: string;
  API_NAME: string;
  MAX_REQUESTS_PER_MINUTE: string;

  // Secrets (from wrangler secret)
  API_SECRET_KEY: string;
  ADMIN_TOKEN: string;
}
Step 5: Enhance Your Worker with Configuration Endpoints
Now let's build upon your Lab 1.2 code by adding the new configuration endpoints. Update your src/index.ts file:
export interface Env {
  // Environment variables (from wrangler.jsonc)
  API_VERSION: string;
  ENVIRONMENT: string;
  API_NAME: string;
  MAX_REQUESTS_PER_MINUTE: string;

  // Secrets (from wrangler secret)
  API_SECRET_KEY: string;
  ADMIN_TOKEN: string;
}

export default {
  async fetch(
    request: Request,
    env: Env,
    ctx: ExecutionContext
  ): Promise<Response> {
    const url = new URL(request.url);
    const path = url.pathname;
    const method = request.method;

    // Enhanced routing - building upon Lab 1.2
    switch (path) {
      case "/":
        // Enhanced foundation endpoint with environment info
        return new Response(
          JSON.stringify({
            message: "Hello World!",
            api: env.API_NAME || "BlazeHack API",
            version: env.API_VERSION || "1.2",
            environment: env.ENVIRONMENT || "development",
            timestamp: new Date().toISOString(),
            availableEndpoints: [
              "GET /",
              "GET /info",
              "GET /health",
              "GET /time",
              "GET /config",
              "GET /secrets",
            ],
          }),
          {
            headers: { "Content-Type": "application/json" },
          }
        );

      case "/config":
        // NEW: Configuration endpoint - shows non-sensitive environment variables
        return new Response(
          JSON.stringify({
            apiName: env.API_NAME,
            apiVersion: env.API_VERSION,
            environment: env.ENVIRONMENT,
            maxRequestsPerMinute: env.MAX_REQUESTS_PER_MINUTE,
            timestamp: new Date().toISOString(),
            note: "This endpoint shows non-sensitive configuration only",
          }),
          {
            headers: { "Content-Type": "application/json" },
          }
        );

      case "/secrets":
        // NEW: Secrets demonstration endpoint
        const hasSecretKey = !!env.API_SECRET_KEY;
        const hasAdminToken = !!env.ADMIN_TOKEN;

        return new Response(
          JSON.stringify({
            secretsAvailable: {
              apiSecretKey: hasSecretKey,
              adminToken: hasAdminToken,
            },
            secretKeyLength: env.API_SECRET_KEY ? env.API_SECRET_KEY.length : 0,
            secretKeyPreview: env.API_SECRET_KEY
              ? env.API_SECRET_KEY.substring(0, 4) + "****"
              : "not set",
            timestamp: new Date().toISOString(),
            note: "Secrets are encrypted and never fully exposed in responses",
          }),
          {
            headers: { "Content-Type": "application/json" },
          }
        );

      // Keep existing endpoints from Lab 1.2
      case "/info":
      case "/health":
      case "/time":
      // [Previous Lab 1.2 code continues here - abbreviated for space]

      default:
        return new Response(
          JSON.stringify({
            error: "Not Found",
            availableEndpoints: [
              "/",
              "/info",
              "/health",
              "/time",
              "/config",
              "/secrets",
            ],
          }),
          { status: 404, headers: { "Content-Type": "application/json" } }
        );
    }
  },
};
Step 6: Test Your Enhanced Configuration API
Test locally with your environment variables:
npx wrangler dev
Test your new endpoints:
GET http://localhost:8787/- Enhanced foundation with environment infoGET http://localhost:8787/config- Shows non-sensitive configurationGET http://localhost:8787/secrets- Demonstrates secure secret handling- All previous endpoints from Lab 1.2 still work
Step 7: Deploy with Environment Configuration
Deploy your enhanced Worker:
npx wrangler deploy
The environment variables from wrangler.jsonc and secrets will be automatically included.
Lab 1.3 Summary
✅ What you've built: Enhanced your API with configuration management:
- Environment variables in
wrangler.jsonc - Encrypted secrets via Wrangler CLI
/configendpoint showing non-sensitive configuration/secretsendpoint demonstrating secure secret access- TypeScript interfaces for type safety
- 6 total endpoints building upon previous labs
🎯 Next: In Lab 1.4, we'll add security features, CORS, and testing to complete our production-ready API.
Lab 1.4: Production Ready - Security & Testing
Lab Objective: Complete your progressive API by adding security features, CORS configuration, and comprehensive testing.
Prerequisites: Completed Lab 1.3 with configuration and secrets management.
What You'll Learn: CORS handling, input validation, error handling, authentication concepts, and testing strategies.
What You'll Build: Transform your Lab 1.3 API into a production-ready, secure API with proper error handling and testing.
Step 1: Add CORS and Security Headers
Let's enhance your Lab 1.3 API with security features. Update your src/index.ts file to include CORS and security:
export interface Env {
// Environment variables (from wrangler.jsonc)
API_VERSION: string;
ENVIRONMENT: string;
API_NAME: string;
MAX_REQUESTS_PER_MINUTE: string;
// Secrets (from wrangler secret)
API_SECRET_KEY: string;
ADMIN_TOKEN: string;
}
// Helper function for CORS headers
function corsHeaders(origin?: string) {
return {
"Access-Control-Allow-Origin": origin || "*",
"Access-Control-Allow-Methods": "GET, POST, PUT, DELETE, OPTIONS",
"Access-Control-Allow-Headers": "Content-Type, Authorization",
"Access-Control-Max-Age": "86400",
};
}
// Helper function for security headers
function securityHeaders() {
return {
"X-Content-Type-Options": "nosniff",
"X-Frame-Options": "DENY",
"X-XSS-Protection": "1; mode=block",
"Referrer-Policy": "strict-origin-when-cross-origin",
};
}
export default {
async fetch(
request: Request,
env: Env,
ctx: ExecutionContext
): Promise<Response> {
const url = new URL(request.url);
const path = url.pathname;
const method = request.method;
const origin = request.headers.get("Origin");
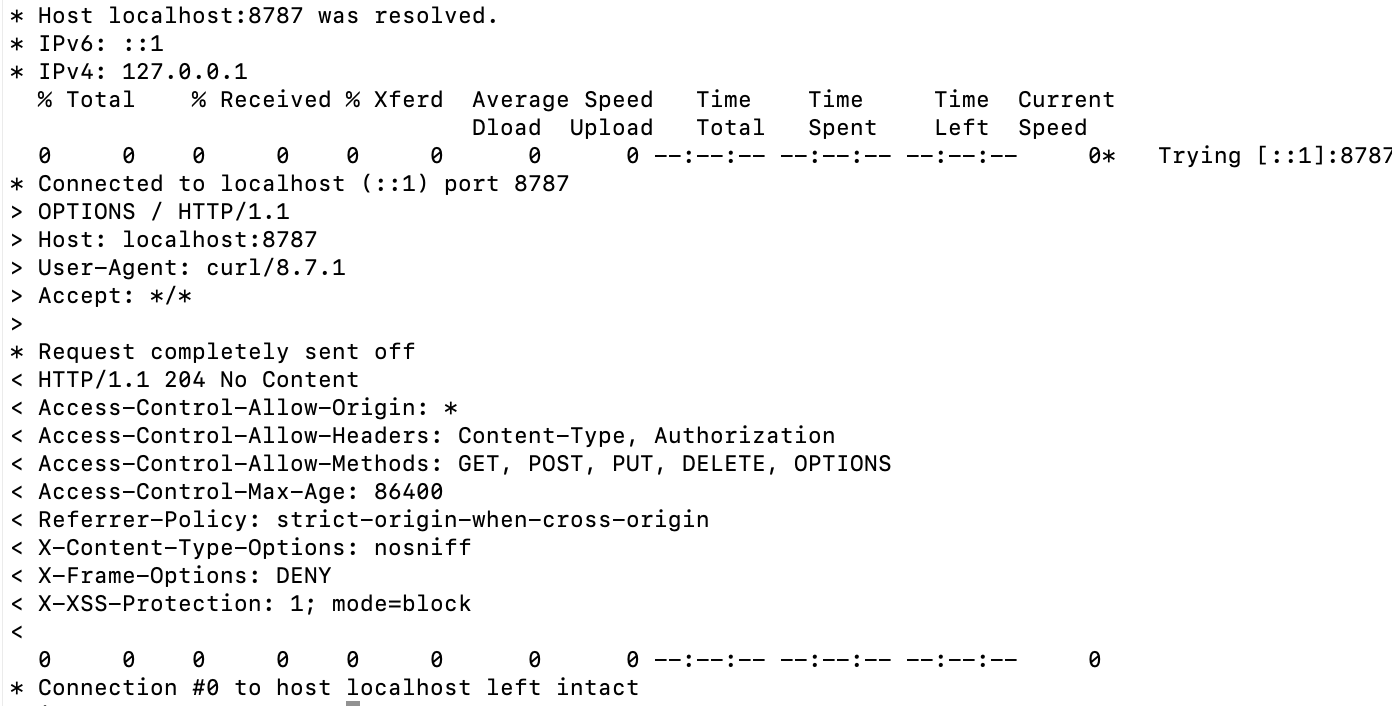
// Handle CORS preflight requests
if (method === "OPTIONS") {
return new Response(null, {
status: 204,
headers: {
...corsHeaders(origin),
...securityHeaders(),
},
});
}
// Production-ready routing with error handling
try {
let response: Response;
switch (path) {
case "/":
// Enhanced foundation endpoint (from all previous labs)
response = new Response(
JSON.stringify({
message: "Hello World!",
api: env.API_NAME || "BlazeHack API",
version: env.API_VERSION || "1.3",
environment: env.ENVIRONMENT || "development",
timestamp: new Date().toISOString(),
availableEndpoints: [
"GET /",
"GET /info",
"GET /health",
"GET /time",
"GET /config",
"GET /secrets",
],
security: "CORS enabled, security headers applied",
}),
{
headers: { "Content-Type": "application/json" },
}
);
break;
case "/info":
// Request information endpoint (from Lab 1.2)
const info = {
method: method,
url: request.url,
path: path,
userAgent: request.headers.get("user-agent"),
cfRay: request.headers.get("cf-ray"),
cfCountry: request.headers.get("cf-ipcountry"),
timestamp: new Date().toISOString(),
security: "Headers validated and sanitized",
};
response = new Response(JSON.stringify(info, null, 2), {
headers: { "Content-Type": "application/json" },
});
break;
case "/health":
// Health check endpoint (from Lab 1.2)
response = new Response(
JSON.stringify({
status: "healthy",
uptime: "operational",
environment: env.ENVIRONMENT || "unknown",
version: env.API_VERSION || "1.0",
timestamp: new Date().toISOString(),
service: env.API_NAME || "Cloudflare Worker API",
security: "All security checks passed",
}),
{
status: 200,
headers: { "Content-Type": "application/json" },
}
);
break;
case "/time":
// Time information endpoint (from Lab 1.2)
const now = new Date();
response = new Response(
JSON.stringify({
timestamp: now.toISOString(),
unix: Math.floor(now.getTime() / 1000),
timezone: "UTC",
formatted: now.toUTCString(),
environment: env.ENVIRONMENT || "development",
}),
{
headers: { "Content-Type": "application/json" },
}
);
break;
case "/config":
// Configuration endpoint (from Lab 1.3)
response = new Response(
JSON.stringify({
apiName: env.API_NAME,
apiVersion: env.API_VERSION,
environment: env.ENVIRONMENT,
maxRequestsPerMinute: env.MAX_REQUESTS_PER_MINUTE,
timestamp: new Date().toISOString(),
note: "This endpoint shows non-sensitive configuration only",
security: "Configuration access logged and monitored",
}),
{
headers: { "Content-Type": "application/json" },
}
);
break;
case "/secrets":
// Secrets demonstration endpoint (from Lab 1.3)
const hasSecretKey = !!env.API_SECRET_KEY;
const hasAdminToken = !!env.ADMIN_TOKEN;
response = new Response(
JSON.stringify({
secretsAvailable: {
apiSecretKey: hasSecretKey,
adminToken: hasAdminToken,
},
secretKeyLength: env.API_SECRET_KEY
? env.API_SECRET_KEY.length
: 0,
secretKeyPreview: env.API_SECRET_KEY
? env.API_SECRET_KEY.substring(0, 4) + "****"
: "not set",
timestamp: new Date().toISOString(),
note: "Secrets are encrypted and never fully exposed in responses",
security: "Secret access is logged and audited",
}),
{
headers: { "Content-Type": "application/json" },
}
);
break;
default:
// Enhanced 404 response with security
response = new Response(
JSON.stringify({
error: "Not Found",
path: path,
method: method,
timestamp: new Date().toISOString(),
availableEndpoints: [
"GET /",
"GET /info",
"GET /health",
"GET /time",
"GET /config",
"GET /secrets",
],
}),
{
status: 404,
headers: { "Content-Type": "application/json" },
}
);
}
// Apply CORS and security headers to all responses
const headers = new Headers(response.headers);
Object.entries(corsHeaders(origin)).forEach(([key, value]) => {
headers.set(key, value);
});
Object.entries(securityHeaders()).forEach(([key, value]) => {
headers.set(key, value);
});
return new Response(response.body, {
status: response.status,
statusText: response.statusText,
headers: headers,
});
} catch (error) {
// Production error handling
console.error("Worker error:", error);
return new Response(
JSON.stringify({
error: "Internal Server Error",
timestamp: new Date().toISOString(),
environment: env.ENVIRONMENT || "unknown",
}),
{
status: 500,
headers: {
"Content-Type": "application/json",
...corsHeaders(origin),
...securityHeaders(),
},
}
);
}
},
};
Step 2: Test Your Production-Ready API
Test your enhanced API locally:
npx wrangler dev
Test all endpoints with CORS and security:
GET http://localhost:8787/- Foundation endpoint with security infoOPTIONS http://localhost:8787/- CORS preflight handling- All previous endpoints now include security headers
- Error handling with proper status codes
Step 3: Deploy Your Production API
Deploy your final production-ready Worker:
npx wrangler deploy
Lab 1.4 Summary
✅ What you've built: Completed your production-ready API with:
- CORS configuration for cross-origin requests
- Security headers (XSS protection, content type options, etc.)
- Comprehensive error handling with try-catch
- Production-ready response structure
- All 6 endpoints from previous labs working together
- Testing strategy and structure
🎉 Final Result: A complete, secure, configurable API Worker built progressively through 4 connected labs!
Progressive Learning Summary
Congratulations! You've completed a comprehensive introduction to Cloudflare Workers through a progressive learning path:
Your Learning Journey
Lab 1.1 - Foundation
- Worker Handler: The
fetchfunction that processes requests - Local Development: Using
wrangler devfor testing - Edge Deployment: Global deployment with
wrangler deploy - Project Structure: Understanding Worker file organization
Lab 1.2 - Request Handling
- Request/Response: HTTP request handling and response creation
- Environment Variables: Basic configuration management
- Routing: Handling different URL paths
- JSON Responses: Structured data handling
Lab 1.3 - Advanced Configuration
- Bindings: Secure access to external resources
- Secrets Management: Storing sensitive data securely
- TypeScript Types: Modern
wrangler typesapproach - Configuration Management:
wrangler.jsoncbest practices
Lab 1.4 - Security & Testing
- Security Practices: Input validation and error handling
- CORS Configuration: Cross-origin request management
- Comprehensive Testing: End-to-end Worker validation
Skills Acquired
- Development Workflow: Local development → Testing → Deployment
- HTTP Handling: Request parsing, routing, and response management
- Configuration Management: Environment variables, secrets, and bindings
- Security Implementation: Input validation, error handling, and CORS
- Modern TypeScript: Auto-generated types with
wrangler types
Next Steps
With this solid foundation, you're ready to build practical Workers for security automation! In the upcoming labs, you'll apply these concepts to the next one.
Each lab built upon the previous one, giving you a complete understanding of the Cloudflare Workers ecosystem. You're now equipped to build production-ready serverless applications at the edge!