Setup & Configuration
Create the Enforcement Engine Project
Start by creating a new Cloudflare Worker project for your Enforcement Engine:
npm create cloudflare@latest enforcement-engine
cd enforcement-engine
When prompted:
- Choose Hello World Example
- Which template: Worker only
- Use TypeScript: Yes
- Use git: Yes (recommended)
- Deploy now: No (we'll deploy manually)
Install Dependencies
The Enforcement Engine needs the official Cloudflare TypeScript SDK to manage IP Lists:
npm install cloudflare
npm install --save-dev @types/node
Configure KV Storage
Create a KV namespace for storing enforcement data:
npx wrangler kv namespace create "ENFORCEMENT_DATA"
Note the namespace ID from the output - you'll need it for wrangler.jsonc.
Environment Configuration
Update your wrangler.jsonc file:
{
  "name": "enforcement-engine",
  "main": "src/index.ts",
  "compatibility_date": "2024-01-15",
  "account_id": "your-account-id-here",
  "kv_namespaces": [
    {
      "binding": "ENFORCEMENT_DATA",
      "id": "your-enforcement-kv-id-here",
    }
  ],
  "services": [
    {
      "binding": "INTELLIGENCE_COLLECTOR",
      "service": "intelligence-collector"
    }
  ],
  "vars": {
    "CF_ACCOUNT_ID": "your-account-id-here"
  },
  "triggers": {
    "crons": ["*/30 * * * *"]
  }
}
Important Configuration Notes:
- Replace
your-enforcement-kv-id-herewith the actual KV namespace ID from the previous step - Replace
your-account-id-herewith your Cloudflare Account ID - The
servicefield must match the exact name of your Intelligence Collector Worker - Both Workers must be deployed to the same Cloudflare account for Service Bindings to work
- The cron trigger runs enforcement every 30 minutes
Service Binding Requirements:
- The Intelligence Collector Worker must be named exactly
intelligence-collector - If using a different name, update the
servicefield accordingly - Service Bindings only work between Workers in the same account
- No authentication is needed between Workers using Service Bindings
Set API Token Secret
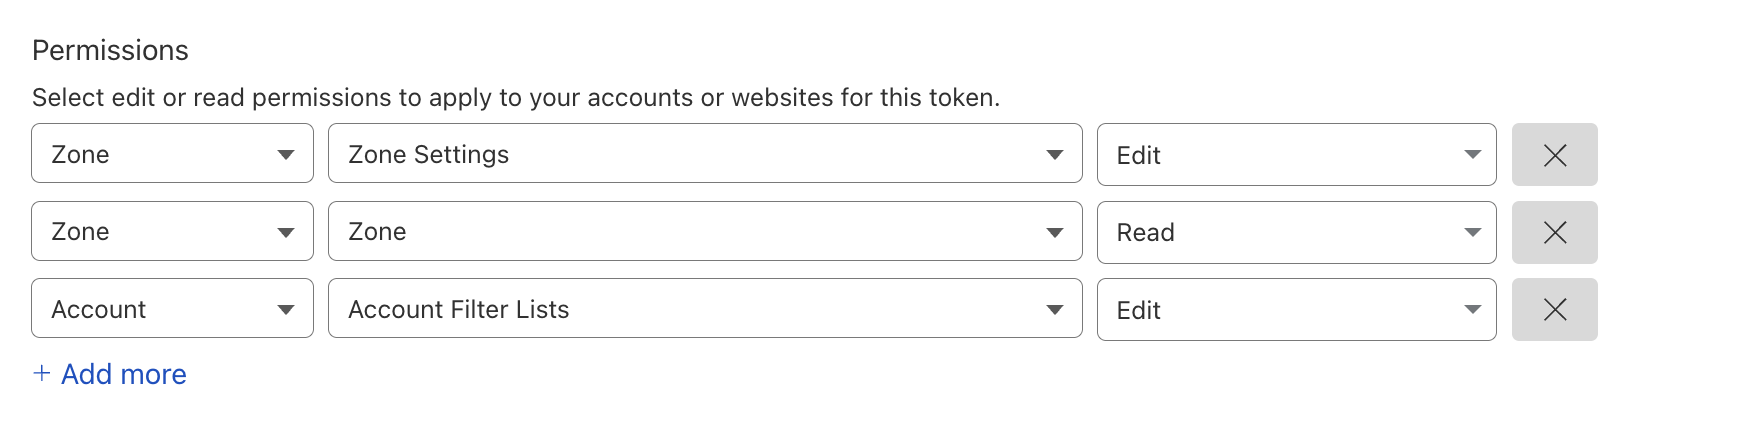
Your Enforcement Engine needs a Cloudflare API token with IP Lists permissions. You can create your custom API token by clicking on your profile at top right button.
The token should have:
- Zone:Zone Settings:Edit permission
- Zone:Zone:Read permission
- Account:Account Filter List:Edit permission (for IP Lists)
REMEMBER to save your API token elsewhere
Once the token is created, use below command to add API token to the worker
npx wrangler secret put CF_API_TOKEN
When prompted, paste your Cloudflare API token.
Development Environment Variables
For local development and testing, create a .dev.vars file in your project root. This file contains environment variables that will be used when running wrangler dev:
# Cloudflare API Token (same token you set as secret above)
CF_API_TOKEN=your_api_token_here

# Your Cloudflare Account ID
CF_ACCOUNT_ID=your_account_id_here

# Optional: Intelligence Collector URL for local testing
# (only needed if testing without service bindings)
INTELLIGENCE_COLLECTOR_URL=https://intelligence-collector.your-subdomain.workers.dev
Important Notes:
- Replace
your_api_token_herewith the same API token you created above - Replace
your_account_id_herewith your actual Cloudflare Account ID - Never commit
.dev.varsto version control - add it to your.gitignore - The
.dev.varsfile is only used for local development withwrangler dev - Production deployment uses the secrets you set with
wrangler secret put
Add to .gitignore:
# Wrangler development environment variables
.dev.vars

# Other common entries
node_modules/
dist/
.wrangler/
TypeScript Environment Setup
Create the complete type definitions file:
// Environment interface for Cloudflare Worker
export interface Env {
  // KV namespace for storing enforcement data
  ENFORCEMENT_DATA: KVNamespace;

  // Service binding to Intelligence Collector Worker
  INTELLIGENCE_COLLECTOR: Fetcher;

  // Your Cloudflare Account ID
  CF_ACCOUNT_ID: string;

  // Cloudflare API token (set as secret)
  CF_API_TOKEN: string;
}

// Response levels for graduated enforcement
export enum ResponseLevel {
  BLOCK = 'block',           // Score ≥ 4
  CHALLENGE = 'challenge',   // Score 2-3
  RATE_LIMIT = 'rate_limit', // Score 1
  LOG_ONLY = 'log_only'      // Score 0 or whitelisted
}

// Enforcement rule definition
export interface EnforcementRule {
  level: ResponseLevel;
  action: string;
  description: string;
}

// Threat IP data from Intelligence Collector
export interface ThreatIP {
  ip: string;
  score: number;
  sources: string[];
  first_seen: string;
  last_seen: string;
  is_whitelisted: boolean;
}

// Enforcement statistics for tracking
export interface EnforcementStats {
  last_update: string;
  total_threats: number;
  blocked_ips: number;
  challenged_ips: number;
  rate_limited_ips: number;
  enforcement_rules: Record<ResponseLevel, string[]>;
}

// Pagination information
export interface PaginationInfo {
  page: number;
  limit: number;
  total: number;
  has_next: boolean;
  has_previous: boolean;
}

// Response metadata
export interface ResponseMetadata {
  timestamp: string;
  request_id: string;
  processing_time_ms: number;
  version: string;
}

// Intelligence Collector API response structure
export interface IntelligenceResponse {
  success: boolean;
  data: ThreatIP[];
  pagination: PaginationInfo;
  metadata: ResponseMetadata;
}

// Define types for enforcement effectiveness
export interface ListHealthInfo {
  list_id: string;
  name: string;
  item_count: number;
  last_modified: string;
  status: 'active' | 'empty';
  sample_ips: string[];
}

export interface EnforcementCoverage {
  blocked_percentage?: number;
  challenged_percentage?: number;
  rate_limited_percentage?: number;
  allowed_percentage?: number;
}

export interface EnforcementEffectiveness {
  timestamp: string;
  enforcement_coverage: EnforcementCoverage;
  list_health: Record<string, ListHealthInfo>;
  threat_distribution: {
    total_threats: number;
    blocked: number;
    challenged: number;
    rate_limited: number;
    allowed: number;
  };
  performance_score: number;
}
KV Storage Schema
Your Enforcement Engine will use these KV keys:
// KV Storage Keys (for documentation)
export const KV_KEYS = {
  // Cloudflare IP List IDs for each response level
  BLOCK_LIST_ID: 'list_ids:block',
  CHALLENGE_LIST_ID: 'list_ids:challenge',
  RATE_LIMIT_LIST_ID: 'list_ids:rate_limit',

  // Enforcement statistics and audit trail
  ENFORCEMENT_STATS: 'enforcement:stats',
  ENFORCEMENT_RULES: 'enforcement:rules',
  LAST_ENFORCEMENT: 'last_enforcement',

  // Test data for demonstrations
  TEST_THREATS: 'test:threats'
};
Basic Worker Structure
Set up the basic Worker structure:
import { Env } from './types';
import { handleStatusPage, handleServiceInfo } from './controllers/status';
import { enforceThreats } from './lib/enforcement';

export default {
  async fetch(request: Request, env: Env, ctx: ExecutionContext): Promise<Response> {
    const url = new URL(request.url);
    const path = url.pathname;

    // Handle CORS preflight requests
    if (request.method === 'OPTIONS') {
      return new Response(null, {
        headers: {
          'Access-Control-Allow-Origin': '*',
          'Access-Control-Allow-Methods': 'GET, POST, OPTIONS',
          'Access-Control-Allow-Headers': 'Content-Type'
        }
      });
    }

    try {
      // Route handling will be implemented in subsequent steps
      switch (path) {
        case '/status':
          return handleStatusPage(env);
        case '/info':
          return handleServiceInfo(env);
        default:
          return new Response(JSON.stringify({
            message: 'Enforcement Engine API',
            version: '1.0.0',
            endpoints: ['/status', '/info', '/test/simulate-attack']
          }), {
            headers: { 'Content-Type': 'application/json' }
          });
      }
    } catch (err) {
      const error = err as Error;
      return new Response(JSON.stringify({
        error: 'Internal server error',
        message: error.message
      }), {
        status: 500,
        headers: { 'Content-Type': 'application/json' }
      });
    }
  },

  // Scheduled function for automatic enforcement
  async scheduled(event: ScheduledEvent, env: Env): Promise<void> {
    console.log('Starting scheduled enforcement...');
    try {
      await enforceThreats(env);
      console.log('Scheduled enforcement completed successfully');
    } catch (err) {
      const error = err as Error;
      console.error('Scheduled enforcement failed:', error);
    }
  }
};
Placeholder Functions
Add these placeholder functions that we'll implement in the following steps:
import { Env } from '../types';

// Placeholder functions - will be implemented in subsequent steps

export async function handleStatusPage(env: Env): Promise<Response> {
  return new Response('Status page - coming in next step!', {
    headers: { 'Content-Type': 'text/plain' }
  });
}

export async function handleServiceInfo(env: Env): Promise<Response> {
  return new Response(JSON.stringify({
    service: 'enforcement-engine',
    status: 'operational',
    timestamp: new Date().toISOString()
  }), {
    headers: { 'Content-Type': 'application/json' }
  });
}
import { Env } from '../types';

export async function enforceThreats(env: Env): Promise<void> {
  console.log('Enforcement logic - coming in next steps!');
}
Test the Basic Setup
Deploy your basic Worker to test the setup:
npx wrangler deploy
Visit your Worker URL to see the basic API response. You should get:
{
  "message": "Enforcement Engine API",
  "version": "1.0.0",
  "endpoints": ["/status", "/info", "/test/simulate-attack"]
}
Verify Environment Configuration
Test that your environment variables are properly configured:
curl "https://enforcement-engine.your-subdomain.workers.dev/info"
Common Setup Issues
KV Namespace Not Found
- Ensure the KV namespace ID in
wrangler.jsoncmatches the one created - Run
npx wrangler kv namespace listto see all your namespaces
API Token Issues
- Verify your token has the correct permissions for IP Lists
- Test the token with:
curl -H "Authorization: Bearer YOUR_TOKEN" "https://api.cloudflare.com/client/v4/user/tokens/verify"
Wrong Account ID
- Find your Account ID in the Cloudflare dashboard sidebar
- Verify with:
curl -H "Authorization: Bearer YOUR_TOKEN" "https://api.cloudflare.com/client/v4/accounts"
Next Step
Great! Your Enforcement Engine project is set up with:
- ✅ Worker project created and configured
- ✅ KV storage namespace ready
- ✅ Environment variables configured
- ✅ API token securely stored
- ✅ Basic TypeScript structure in place
Next, we'll implement the graduated response system to determine enforcement actions based on threat scores.